
Add or edit form fields
- Click Websites from the main navigation bar
- Click Website List from the sub menu
- Click on the card for the website you wish to make changes to
- Click Forms from the sub menu under your selected website
- Click Settings from the resulting sub menu
- Click the name of the form you want to edit from the main list
- Drag a Content Block from the left panel into the center to add it to your form
- Edit the settings of a Content Block by clicking on the dropdown arrow
- You can duplicate a Content Block by clicking the Copy icon when the Content Block's settings are open
- Make a Content Block required by toggling on the Required toggle. A required field must be filled out before the form can be submitted.
- Click Save when finished.
Note: Do not change the form key on any form. This is a unique identifier used by the platform to connect the form to the correct location on your website. Changing it will break that connection.
How to Remove a Form Field
-
Click on an existing field in the form to expand its view
-
Click the garbage can icon in the bottom-right corner of the field
-
Confirm removal on the popup prompt
How to Reorder Form Fields
Click and hold the six purple dots on the left side of any field and drag it to the desired position.
Available Form Element Types
Plain Text A free-text input field. Use for open-ended questions like "Number of occupants" or "Any additional comments."
Move-In Date Selector A pre-built date picker that asks the prospect for their desired move-in date.
Unit Type Selector A dropdown that automatically populates with your unit type names from Rentsync (e.g., Studio, 1 Bed, 2 Bed). Useful for asking which unit type the prospect is interested in.
File Upload allows the prospect to upload files to the form.
Display text a single line of text that will display without action required.
Radio Buttons (Single Selection) Allows the prospect to choose one option from a list. All options are visible on the form. Examples: "Do you have pets? Yes / No" or "Are you a smoker? Yes / No."
Select Box (Single Selection) Allows the prospect to choose one option from a list in a drop down format. The options are only present when clicking into the drop down field.
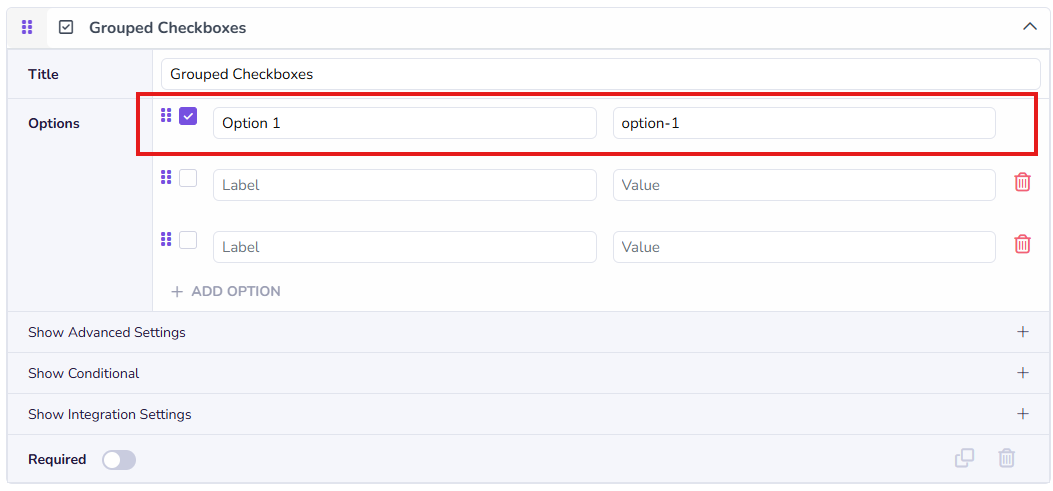
Group Checkboxes (Multiple Selection) Allows the prospect to choose more than one answer. Use when multiple selections are valid. All options are visible on the form. (e.g., "Which amenities are important to you? Parking / Gym / Rooftop patio").
Note: When adding options for Radio Buttons, Select Box and Grouped Checkbox, the text entered in the Label is what will appear in the website form. The field must also be copied exactly into the Value field. If the Value field is left empty, the selection will appear blank in the Rentsync platform and email sent to the agent/prospect. The value will paste in lowercase with dashes “-” this is expected and correct.
Default Selections on Radio Buttons, Select Box and Grouped Checkbox
If you check an option while building a radio button field, that option will appear pre-selected on the form. If you want the form to start blank with no pre-selection, do not check any option during setup. Note that once an option is checked for Radio Buttons and Select Box, it cannot be unchecked, you would need to delete that option and re-add it.
Tips:
- Use radio buttons/Select Box for simple yes/no or single-choice questions; use group checkboxes when multiple answers are acceptable
- Never ask for sensitive Personally Identifiable Information (Ex. SIN numbers, driver's license numbers, credit card information, or bank details)
Note: Click Save in the bottom-right corner of the page before navigating away. You can make multiple edits before saving, you do not need to save after each individual change.
For Advanced and conditional settings go to the Advanced and Conditional Settings on Website Forms article.